Vinyl Siding Installation Richmond VA is a great service that enhances a home’s appearance and protects it from moisture damage. The installation process involves a series of steps from start to finish, starting with preparing the wall surface and ensuring sheathing and flashing are properly installed.
This includes removing protrusions like downspouts or light fixtures that could get in the way of the installation. It also includes assessing and repairing existing walls, including caulking or sealing problem areas.
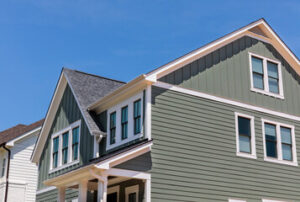
If your home’s exterior is looking drab, installing new vinyl siding can add value and curb appeal. This affordable option is also resistant to the weather and pests that can damage wood, resulting in mold, mildew, and warping.
However, it’s important to choose a reputable and experienced contractor for the installation process. Look for one with plenty of references from previous customers and a solid track record. They should also carry local work insurance and be certified by a manufacturer for quality products and warranties.
Prior to the actual installation date, contractors will need to prepare the site. This includes assessing wall conditions, clearing the work area, and setting up a clean workspace. It’s important to make sure the site is free of obstructions like light fixtures, down-spouts, trim pieces, house numbers, and mailboxes. Then, the sheathing of the walls should be covered with a water-resistant barrier to prevent moisture intrusion. Finally, a starter strip is installed at the bottom of the wall to ensure a secure starting point for the vinyl panels.
Once the prep work is complete, it’s time to start the installation. It’s important to follow strict rules when nailing and fitting the vinyl panels to avoid future problems like uneven walls or leaking gaps. When the first section is in place, contractors will install utility strips around windows and corners, then finish soffits and fascia with flashing and trim pieces.
Choosing the right color for your vinyl siding is another crucial decision. Fortunately, homeowners can pick from a variety of vibrant hues to enhance the appearance of their homes. Crisp whites can create a modern, classic look, while earthy tones and rich browns add warmth and sophistication. Vibrant blues and greens can complement the natural beauty of your yard.
It’s also important to choose the best vinyl siding for your region. Heavy rains and high humidity can be difficult for wood siding, but vinyl is impervious to these conditions. Moreover, it’s highly durable against the sun’s UV rays and withstands extreme temperature fluctuations. For these reasons, vinyl is a great choice for homeowners in the Mid-Atlantic region.
Site Inspection
Whether you are constructing a new building or renovating an existing one, it’s important to conduct site inspections before beginning any work. These are in-person meetings with a venue, service or vendor to review the physical properties of the location and any potential risks or obstacles. This process can also help you establish an effective timeline for your project and ensure that all deadlines are met.
Before conducting a site inspection, it’s helpful to have an outline of the steps you need to take and any information you will need to gather. This includes taking photographs, measuring the site, and analyzing any potential issues or challenges that could affect the outcome of the inspection. In addition to the general data collected, it’s also a good idea to speak with individuals who are involved in the site and any other stakeholders who might be able to provide insights into the site’s conditions.
A thorough site inspection is necessary for the successful installation of vinyl siding. It can reveal problems that would otherwise go unnoticed and cause costly delays in the completion of the project. These include water rot, sheathing damage, and the presence of asbestos. If any of these conditions are discovered, they must be addressed prior to starting the vinyl siding installation.
When conducting a site inspection, it’s essential to keep in mind that the vinyl siding will expand and contract during different weather conditions. It’s important to hammer the nails into the nail hem slots and leave a gap between the head of the nail and the vinyl (about the width of a dime). If you do not allow for expansion and contraction, the nails may loosen or even pull out completely.
Once you’re ready to start installing the vinyl siding, it’s a good idea to use spacers or shims to ensure that the wall is straight and level. You should also check the horizontal alignment of the panels every few rows, paying special attention to the corners and windows. Lastly, it’s important to follow the instructions provided by your particular vinyl siding manufacturer. The Vinyl Siding Institute has produced a number of excellent instructional videos to help guide first-time installers.
Siding Installation
The installation of vinyl siding can be a daunting task, but with the help of an experienced home improvement professional, it is possible to ensure a smooth, high-quality result. Regardless of whether the project is new construction or a remodeling of an existing structure, the process starts with preparing the wall surface for the new siding. This includes removing the existing exterior and trim pieces and installing a water-resistive barrier, which is essential for preventing incidental moisture infiltration. The contractor should also verify with local building codes to ensure proper sheathing, insulation and flashing are in place.
Depending on the size of the structure, a vinyl siding installation may require multiple stages. A good work plan will include establishing a staging area that is free from debris, ensuring the vinyl siding is properly trimmed to fit each piece, and arranging the pieces to be installed in a logical order. The work space should be well lit and clean and should contain all tools and equipment for the job. Proper PPE should be worn at all times, including gloves and safety glasses to protect the hands and eyes, a face mask to prevent inhalation of harmful fumes, and adequate ventilation if working indoors with loud power tools.
Once the work area is ready for the first course of vinyl siding to be installed, the starter strip must be leveled and fastened. Then, each subsequent course should be locked into the starter strip and nailed to the wall. The installer should be careful not to over-nail, which can cause the insulating foam inside the panel to compress and lose its insulating value. When nailing, a 1/32″ clearance (the thickness of a dime) should be left between the head of the fastener and the vinyl hem slot to allow for expansion and contraction.
When gable walls are being sided, the installer should measure the angle of the eave using a protractor or angle finder and mark that measurement on the vinyl siding with a square or straight edge. Then the angled cuts can be made with a utility knife, tin snips or compound aviation-type snips.
Final Inspection
In the construction industry, the final inspection is one of the most important stages. It ensures that building projects meet standards, quality, and compliance. It also serves as a last opportunity to address issues before a project can be declared complete and ready for occupancy. Therefore, it is essential for construction professionals to understand and navigate the process successfully.
During the final inspection, a building inspector will review all completed work to make sure that it meets all applicable codes and standards. This includes addressing notches, cuts, and penetrations in structural frame elements as well as providing accessibility for safe egress. Additionally, a building inspector will ensure that all materials are installed properly, such as the proper insulation and moisture barriers. In addition, they will verify that all electrical and plumbing fixtures are properly connected and working correctly.
To prepare the wall for vinyl siding installation, a contractor will need to remove any existing material and repair any flaws or irregularities in the surface. In addition, they will need to install a weather-resistant barrier like house wrap. Then, the installer will begin attaching the vinyl siding panels. They will start with the starter strip and then continue upwards, making sure to leave a small gap at the bottom for thermal expansion and contraction. They will also need to pay attention to the alignment of the siding panels, particularly around corner posts and windows. Finally, they will need to install trim and utility strips.
The most important thing to remember when installing vinyl siding is that it’s a dynamic material that requires a great deal of attention and care. By following best practices, using the right tools, and adhering to community rules, contractors can achieve a flawless finish that enhances both the functionality and visual appeal of homes.
Whether you are looking to improve the look of your home or simply make it more energy-efficient, vinyl siding is a versatile and cost-effective option. By utilizing the proper installation techniques and taking into account local building codes, homeowners’ association regulations, and safety standards, you can ensure that your vinyl siding is installed properly to protect your home from water damage.